Monitor Azure virtual servers via VM extension
Add a monitor via VM extension in Azure and view all your critical metrics in the Site24x7 dashboard. Azure users can now add a Windows or a Linux monitor in a more simplified way without the need to download the agent.
You can add a server monitor via VM extension using one of the three ways:
- Adding a VM extension using the Azure UI portal
- Adding a VM extension via PowerShell
- Adding a VM extension via Azure CLI (Command Line Interface)
Add a VM extension using the Azure UI portal:
- Login to Azure portal
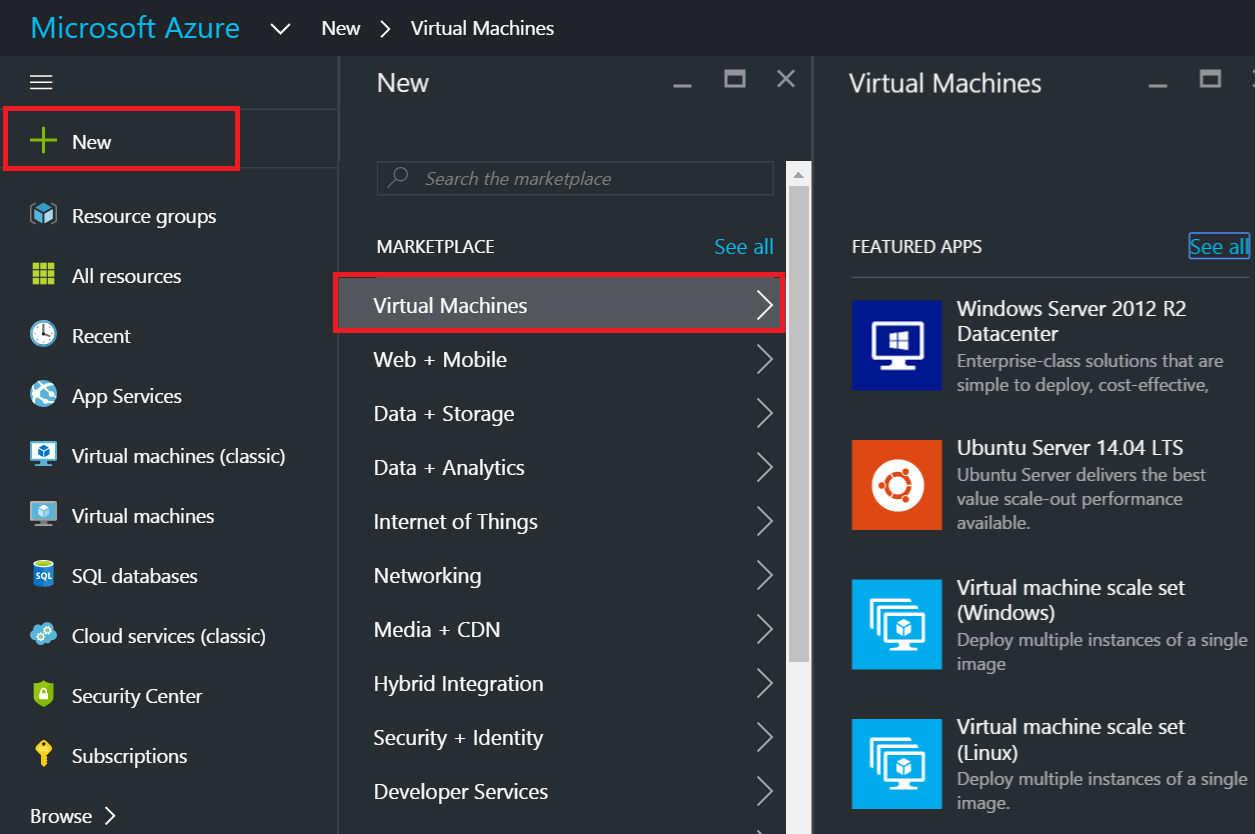
- If you are creating a new VM, navigate to New > Virtual Machines > select any of the Windows/Linux Server apps listed for adding a Windows/Linux monitor

NoteYou can also add a new VM by navigating to Resource Groups > Add (+) > Select any of the Windows Server apps listed
- In case you already have an existing VM in Azure, navigate to Virtual Machines > select the VM to which you want to add the extension
- Choose deployment model (Classic/Resource) > click Create

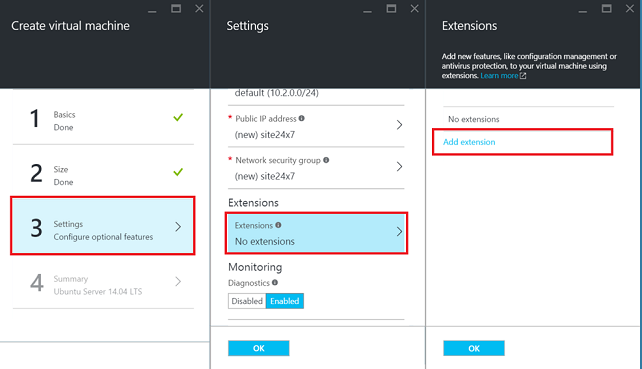
- Configure basic settings, size of the VM, and other optional features
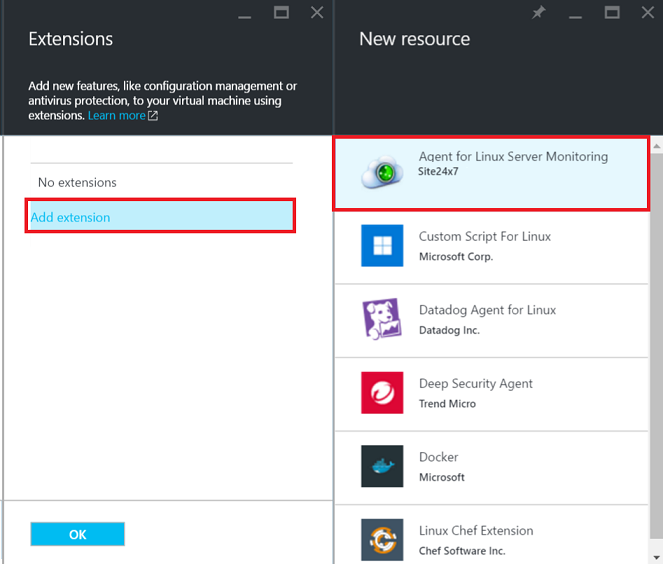
- Under Settings blade, go to Extensions > Add Extension (+) > Server Monitoring for Windows/Linux - Site24x7


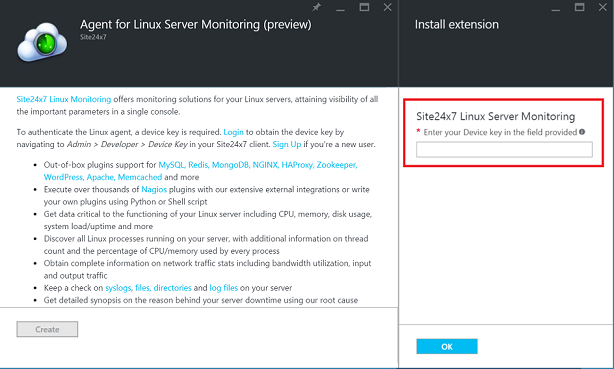
- To authenticate the Windows/Linux agent, a device key is required. Login to Site24x7 and navigate to Admin > Developer > Device Key in your Site24x7 client. Sign Up if you are a new user.
- Click Create
- Enter the obtained device key in the field provided. Click OK

- You can now view your monitor in the Site24x7 dashboard and start monitoring your critical metrics
Add a VM extension via PowerShell:
Prerequisite:
Make sure the Azure PowerShell SDK is installed and supported from version 2.6 and above
Using Classic model:
- Login to Microsoft Azure portal by entering the command
Login-AzAccount
- After logging in, execute the command
For Linux server,For Windows server,Set-AzVMExtension -SettingString '{"site24x7LicenseKey":"Your Device Key from Site24x7 portal"}'
-Publisher Site24x7 -ExtensionType Site24x7LinuxServerExtn
-Version 1.8 -Name "Site24x7LinuxServerExtn"
-ResourceGroupName "Your resource group's name"
-Location "Your VM's location" -VMName "Your VM Name"Set-AzVMExtension -ResourceGroupName "Your Resource Group's Name"
-Location "Your VM Location" -VMName "Your VM Name"
-Name "Site24x7WindowsServerExtn" -Publisher "Site24x7" -ExtensionType "Site24x7WindowsServerExtn"
-TypeHandlerVersion "1.8"
-SettingString '{"site24x7AgentType":"azurevmextnwindowsserver" , "site24x7LicenseKey":"SITE24x7 Device Key"}'
Using Azure Resource Manager (ARM):
Please follow the below steps to add a VM extension via PowerShell using ARM:
- Log in to Microsoft Azure portal by entering the command
Login-AzureRmAccount
- After logging in, execute the command
For Linux server,For Windows server,Set-AzureRmVMExtension -ProtectedSettingString '{"site24x7LicenseKey":"enter your licensekey"}' -Publisher Site24x7
-ExtensionType Site24x7LinuxServerExtn -Version 1.5 -Name <Any extension name> -ResourceGroupName <resourcegroup name> -Location <location> -VMName <vm name>Set-AzureRmVMExtension -ProtectedSettingString '{"site24x7AgentType":"azurevmextnwindowsserver" , "site24x7LicenseKey":"enter your licensekey"}' -Publisher Site24x7 -ExtensionType Site24x7WindowsServerExtn -Version 1.5 -Name <Any extension name> -ResourceGroupName <resourcegroup name> -Location <location> -VMName <vm name>
- "site24x7LicenseKey" is the Device key that can be obtained from Admin > Developer > Device Key
- The SettingString, Publisher, ExtensionType and the Version in the command string should not be changed
- The user can modify -Name that will be visible in the Extension portal (Settings > Extensions)
For both Classic and ARM models,
Get version and other properties of the extension by executing the following commands:
Get-AzureVMAvailableExtension -ExtensionName Site24x7LinuxServerExtn
Get-AzureVMAvailableExtension -ExtensionName Site24x7WindowsServerExtn
Get the list of locations:
Get-AzureLocation
Remove an extension:
For Linux server,
Remove-AzureRmVMExtension -VMName <vm name> -Name Site24x7LinuxServerExtn
-ResourceGroupName <resourcegroup name>
For Windows server,
Remove-AzureRmVMExtension -VMName <vm name> -Name Site24x7WindowsServerExtn -ResourceGroupName <resourcegroup name>
Adding a VM extension via Azure CLI (Command Line Interface):
[Available only for Linux platform]
- For Azure CLI version 1.0, login to Microsoft Azure portal and execute the following command:
azure login
azure vm extension set -g <resource-group-name> --vm-name <vm-name> --version 1.5 --publisher-name Site24x7 -n Site24x7LinuxServerExtn --private-config "{\"site24x7LicenseKey\":\"ab_9868f27c8a45b2fc76088c8ecec7bd7305f59661\"}" --public-config "{\"site24x7AgentType\":\"azurevmextnlinuxserver\"}" - For Azure CLI version 2.0, use the following commands to login and install the vm extension:
az login
az vm extension set --publisher Site24x7 -n Site24x7LinuxServerExtn -g <resource-group-name> --vm-name <vm-name> --version 1.5 --protected-settings "{\"site24x7LicenseKey\":\"ab_9868f27c8a45b2fc76088c8ecec7bd7305f59661\"}" --settings "{\"site24x7AgentType\":\"azurevmextnlinuxserver\"}"
You can also associate configuration profiles while adding a VM extension via Azure CLI. Learn more.
